Friday 31 July 2015

It is working fine now

Notice - I have no control over the Blogger environment in terms of cookies and associated tracking/profiling, you should satisfy yourself that you accept the Blogger use terms. I do not use advertising banners or click bait to monetise my blogs. I shall consider responding to messages but I may chose not to reply to individual messages, please do not be offended by this in most cases I would simply rather spend time experimenting than typing.

It is working fine now

After a further update to the Microsoft .Net framework the Repetier software seems to be happy to connect with the printer. I adjusted the temperature down to 190 deg C and it has printed a cleaner test cube via the Repetier software control.

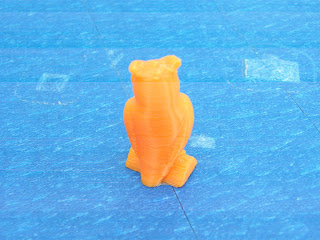
I decided to print something with a bit more form and found an STL of an owl on a log which did not look like it would need support, so I downloaded it and scaled it down (using MeshLab) to make a small figure to test the accuracy of the printer.


The printer in action, printing the owl figure


Close up of the finished owl - I think it is pretty good quality.


The back of the owl is a smooth curve which it has coped with very well.

All in all I am pleased with the printer but would have appreciated better software/instructions but I got there in the end.

Software and first print

Notice - This website has asked me to notify you that it uses cookies to store information on your computer,  the cookie function is out of my control as the site is hosted by Blogger (which has Google connections). Most cookies are used to make a website work and others are used to help improve it by providing some usage details (e.g. time spent on page, approximate geographical location etc). I am not an expert on cookies and suggest that you satisfy yourself that you understand cookies adequately and how to manage them. If you want to limit the use of cookies you can adjust your cookie preferences and also delete cookies, some browsers also allow you to enable secret browsing. I hope this helps you to make a conscious decision about cookie management.

Software was provided on a flash card (with the kit), it contained:
Assembly Manual
  • User Manual (including some software instructions)
  • Marlin (to flash the printer motherboard with Arduino)
  • Arduino (to configure the printer motherboard)
  • Reptier (to control the printer - includes Slic3r to configure the build)
  • Pronterface (to control the printer - used for initial set up - seems to be the best package and the one I ended up using for the first print)
Instructions were quite vague particularly about setting the nozzle height above the bed, after doing the paper contact test you need to put the new value in the Arduino software and re-flash the printer motherboard. A word search for "define MANUAL_Z_HOME_POS" found the file, then I replaced the 270 value with the new one (in my case 281.1). After the reflash the new Z value appears on the printer display.

Note - gcode is the key to making things work, a useful code is G28 as it raises and resets the printer head to the top positions, G29  is auto set up, I only attempted to use this after setting the new Z value.

After some failed attempts to use Repetier to perform the print (it did not seem to be able to communicate with the printer although it said it was connected) I gave up and ended up using Repetier to create the gcode with the embedded Slic3r and then importing the gcode into Pronterface and then set it to print.

After all this fiddling about, it finally printed the test cube, from the STL file provided (pictures below).


Orange cube on bed

 Close up of Orange cube

There should be an outer reference square ring but this didn't stick, I think the set Z height may still be too high. Also the print accuracy seemed to drop off, I think it was getting too hot and temperature should reduce as it moves away fom the cold build plate.

Conclusion - More experimentation required to produce quality products. I also need to decide if I will use PLA or ABS.

I prefer to use Linux, so will also explore alternative printer control software.


Wednesday 29 July 2015

Build the kit

Notice - This website has asked me to notify you that it uses cookies to store information on your computer,  the cookie function is out of my control as the site is hosted by Blogger (which has Google connections). Most cookies are used to make a website work and others are used to help improve it by providing some usage details (e.g. time spent on page, approximate geographical location etc). I am not an expert on cookies and suggest that you satisfy yourself that you understand cookies adequately and how to manage them. If you want to limit the use of cookies you can adjust your cookie preferences and also delete cookies, some browsers also allow you to enable secret browsing. I hope this helps you to make a conscious decision about cookie management.
 
Today was spent building the kit, pictures taken at various points below:


 Four stepper motors, one has longer wires for filament feed
 First fix stepper motors to bottom brackets
 Two per motor
 Then fit arms - good idea to invest in ball ended Allen keys for assembling many parts
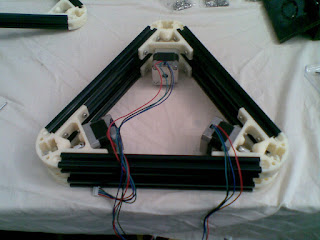
 Assemble top parts into a triangle
 Assemble bottom parts into a triangle (slide together at same time)
 Fit belt pulleys
 Fit hot end contact switch
 Fit arms
 Assemble roller sets
 Fit limit switches to uprights
Fit rollers to arms
  Assemble all the bits into a frame with rollers connected to arms
 Assemble hot end into carrier
Fit and trim drive belts
 Filament feed motor mounting position
 Main board and display mounted and connected up
 Power and USB connections
Glass bed (covered in what looks like masking tape) held in place with six screws and deeper nuts


Thoughts - generally quite fiddly to build and instructions sometimes lacked detail.
Some screws are only threaded into plastic which could become a weakness over time but they currently feel quite secure. One area of particular concern was the hot end hinge was not free floating against the micro switch, I spent a lot of time working the screws in and out to create a running clearance but with no slop. The adjustment of this seems quite vague too.
The nuts inside rails sometimes turn rather than grip, so they need to be held when tightening the screws, I wedged them with a small Allen key.
The main circuit board and display were easy to wire up and mount but there wasn't much wrap for double insulation, so I taped up the wires with black insulation tape. I decided to mount the filament feed motor on the side of the frame rather than the top as this seemed to give a smoother curve across the whole working range. This may change once tested and may depend on spool position.
Tomorrow the software.

Tuesday 28 July 2015

It has arrived

Notice - This website has asked me to notify you that it uses cookies to store information on your computer,  the cookie function is out of my control as the site is hosted by Blogger (which has Google connections). Most cookies are used to make a website work and others are used to help improve it by providing some usage details (e.g. time spent on page, approximate geographical location etc). I am not an expert on cookies and suggest that you satisfy yourself that you understand cookies adequately and how to manage them. If you want to limit the use of cookies you can adjust your cookie preferences and also delete cookies, some browsers also allow you to enable secret browsing. I hope this helps you to make a conscious decision about cookie management.


I have just taken delivery of a Kossel delta 3d printer kit.

I thought I would blog my experiences as a 3D printer novice, I hope you find it useful.

Below are the unpacking pictures:

Open the box - contents list provided to check off parts against (but no pictures to help check the parts)


Embargo means you don't get the Silicon


Box 1 contents


Box 2 contents
 Box 3 contents
Box 4 contents
Box 5 contents
Box 6 contents


Box 7 contents
Short frame rails
Long frame rails
Test filament, filament feed tube, memory card containing instructions and software and a USB adapter for the memory card. Note that the Software only works with Microsoft.

Just reading the assembly manual 80+ pages.